Whether you’ve converted the second bedroom into your new award-winning mix facility, hijacked the top end of the dining table, or evicted the family Flymo® from the garden shed, let’s explore some tips, tricks, issues, and best practice when setting up your home working environment.
Environment
Before settling on a location for your studio setup, consider how long you expect to be working from home. Does your need for a professional, well-thought-out work environment outweigh the inconvenience the family might feel from having you take over the dining room for eight hours a day?
Acoustics
Small room acoustics is an incredibly interesting subsection of acoustics which presents an entirely unique set of issues compared to large concert halls or auditoria. How can we deal with these acoustic phenomena, without breaking the bank, to create a workable soundscape similar to a top-end bespoke Soho dubbing theatre?
Parallel walls
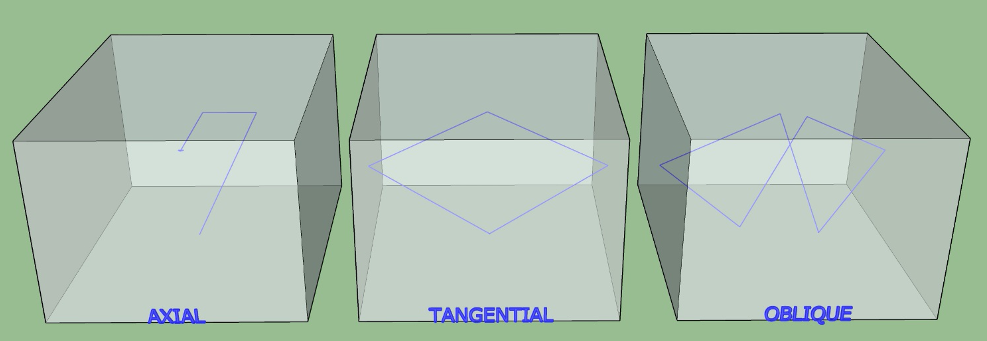
Standing waves are one of the most difficult acoustic issues to deal with in small rooms. They are caused by sound waves reflecting off parallel walls resulting in nodes and antinodes. Standing waves are most apparent at low frequencies, where half wavelengths are equivalent to the distance between two walls; however, they reoccur at every integer multiple of this frequency. For example, in a 4x3x2.5m room, the first three standing waves would occur at 43Hz, 57Hz & 69Hz, and every multiple of these values. These are examples of axial modes which are the strongest modes; you can also have issues with tangential modes which involve two sets of parallel walls, and oblique modes which involve all six surfaces.
How can we tackle this issue? The easiest way to deal with modes in an untreated room is to work out where the biggest problem occurs and avoid it. If you find that your room has a null at 100Hz at your mix position, and you are mixing a male VO, you may have some issues as the fundamental frequency of a typical male adult is between 85-180Hz, so you may end up boosting or cutting that frequency in your mix whilst your room is attenuating or multiplying the energy at that specific frequency, resulting in a potentially massive overcompensation in your mix. Here is a handy link to work out standing waves and room modes.
Room Distortion
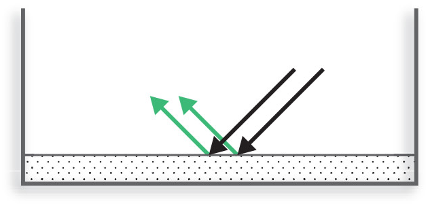
Hard surfaces cause reflections, reflections cause time and level delays in reflected sound waves reaching your ear, this, in turn, causes cancellations, flutter echoes, reverberation, and localisation problems, all of which contribute towards room distortion.
Image courtesy Genelec®
The RT-60 of a room is a numeric value representing the reverberation time of a room. Reverberation is effectively the sum of all the reflected sounds waves from each boundary of the room. In a professional mixing room, you would aim for between 0.3 and 0.5 seconds.
Walls, ceilings, windows, desktops etc., all cause unwanted reflections which can affect your mix. As you move up the frequency spectrum, wavelengths get smaller and become easier to deal with. In the studio, you would build absorption into the walls and place diffusers in problem areas.
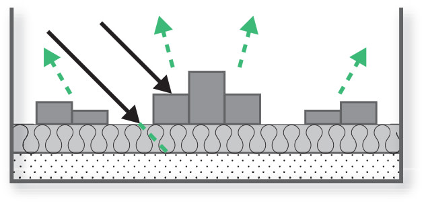
Image courtesy Genelec®
At home, where space and architecture are a consideration, there are some tricks we can employ which mimic the function of studio grade acoustic treatment. Typically, you would apply absorption to the front and side walls, and diffusion to the rear wall, depending on the dimensions of the room.
If you do want to invest in acoustic treatment, check out Vicoustic who make a range of absorption, diffusion and bass trap products for home, office and studio use.
Furniture – sofas, wardrobes full of clothes, coats hung on the back of doors, all provide absorption for high and mid frequencies. Bookcases and shelves full of knick-knacks are great for diffusion. Remember, the aim is to stop direct reflections reaching your mix position; the further the reflected sound has to travel, the less energy it will have when it finally reaches your ears.
Heavy fabrics – curtains can help mask a hard, reflective window even if it’s behind your speakers. Front wall reflections are some of the worst offenders.
Symmetry – Symmetry is key, if possible, and I know this is a big ask, but try to apply the same amount of treatment to each side of your room to help stop the soundstage pulling to one side or the other.
Equipment setup
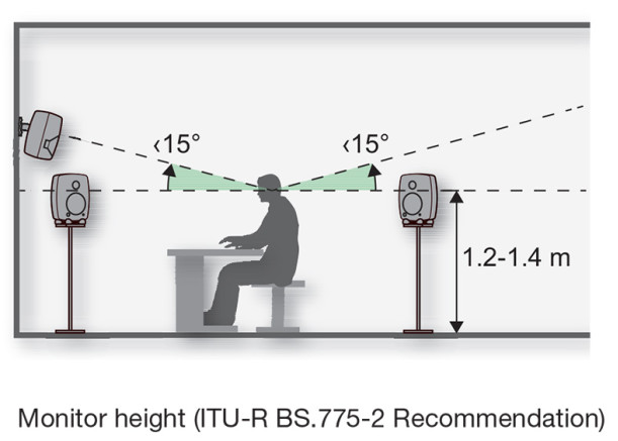
Correct speaker placement is often overlooked. The correct position for your speakers should be 60 degrees apart at equal distance from the mix position.
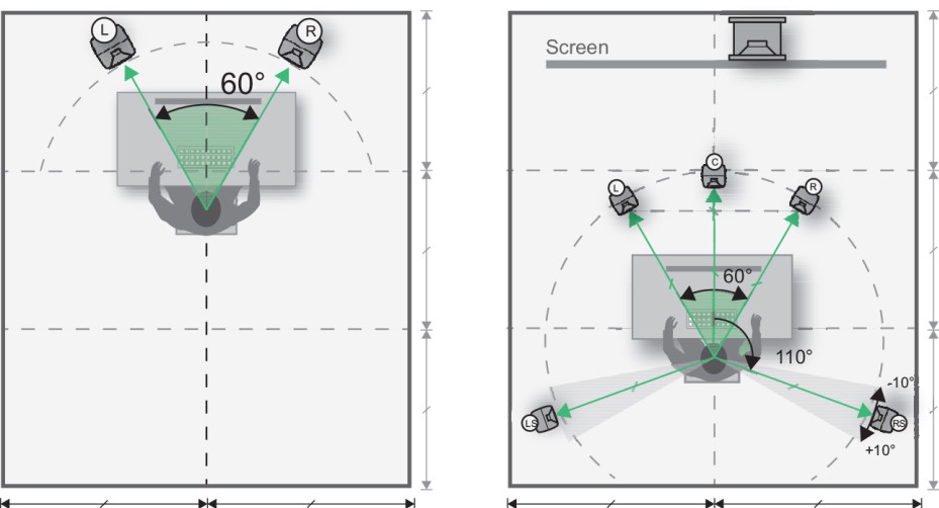
You should aim to have the acoustic axis of the speaker (check your manual) at ear height.
Image courtesy Genelec®
If you’re lucky enough to have speakers or I/O which has built in audio processing capabilities such as the Genelec GLM range of speakers, Avid MTRX with SPQ options/MTRX Studio, BSS Soundweb London or JBL Intonato, then you may be able to correct some acoustic issues in your room using built in, or complementary software. GLM and Intonato can scan each speaker within your room using their supplied measurement microphones and apply EQ and delays to compensate for acoustic irregularities, whereas SPQ and BSS offer a more analogue option to dial in your own EQs.
Mixing on headphones
Sometimes there just isn’t enough physical room for a set of studio monitors, equally you may be sharing the home office with other family members who might not appreciate you searching your entire sound library for the perfect gunshot or baby fart.
Headphones to the rescue! Look out for over-ear, open-back headphones from a reputable manufacturer. Whether you love or hate mixing on headphones, if it means you can keep working late into the evening, or reduce the risk of sleeping on the sofa, headphones are the way to go. Here are a few options at a fraction of the cost of a stereo pair of studio monitors. We would suggest looking into Sennheiser’s HD600, AKG’s K701, or Beyerdynamic’s DT880.
Comfort and Wellbeing
Whilst those pesky emails from HR telling you to sit up straight and keep your arms and legs at 90 degrees to your torso can miss the mark somewhat when aimed at a mixer, who spends eight hours a day locked in a dark room mixing at 85dB SPL, spending a bit of time and effort on your new work environment can go a long way to keeping you happy and relaxed whilst working from home.
Other factors to consider are:
Good lighting – try to avoid screen glare from overhead or desktop lamps
Distractions – close the door and ask family members (including Mittens, the cat) to respect your new workspace – and that’s not just to do another shuttle run to the fridge! Work out a schedule for the day and stick to it! Your relaxing home has just become a dual-purpose workplace, try to keep some separation between home and work. If this isn’t possible due to location, time management is the way to go. Start work at 9am and finish at 6pm, and enjoy commuting straight to the sofa or out into the garden for a bit of vitamin-D!
Don’t get caught out!
Cables and Adaptors
If you’re bringing equipment home from the studio, check that you have the correct cables to connect equipment together, especially video monitors. Many new displays use HDMI, DisplayPort or Mini DisplayPort; older kit may still have DVI or VGA, so you will need an adaptor to connect!
iLok and Authorisations
Do you need Ultimate features from Pro Tools to keep working? Multiple video tracks, advanced automation options and surround sound mixing are all Ultimate features, so remember to grab the studio iLok, as your standard Pro Tools license may not cut it.
Plugins
3rd party plugins often have different licensing options and require user accounts to download the latest versions, so remember to request account details from your engineering team or deactivate local studio licenses if you need to transfer them to a home machine. Network
How many network connections do you require? Ethernet connected controllers, broadband, host machine… do you require a network switch to hook it all up?
Working from home is no longer just for tech start-ups and freelancers, but something many companies are adopting. For mixers, there is a big difference between sending the occasional work email and having to edit to a mix. These tips and tricks serve to help any audio professional get the most out of their home studio set-up, wherever it may be.


